
 For most people, getting fit not only makes you feel better physically and mentally, desired weight loss happens as a matter of course. There seems to be, however, parts of the body from which fat seems stubborn to leave: “love handles” and the belly.
Yoga is a low-impact form of exercise that contributes to both physical and emotional well-being. Developed in India thousands of years ago as a means to join body, mind, and spirit in a place of peace, yoga has a place in a modern exercise regime to rid ourselves of physical and mental toxins and—you guessed it—belly fat.
Below are ten yoga positions found to strengthen and tone your midsection. All exercises are best done on a thin cushioned firm surface, such as a yoga mat.
Yoga Belly Fat Workout
This poses will relax your mind and work your body!
1. Pontoon Pose (Naukasana)
An Indian crunch, this yoga pose strengthens lungs, liver, and pancreas while reducing belly fat. It improves circulation and tones abdominal, leg, upper arm, and back muscles.
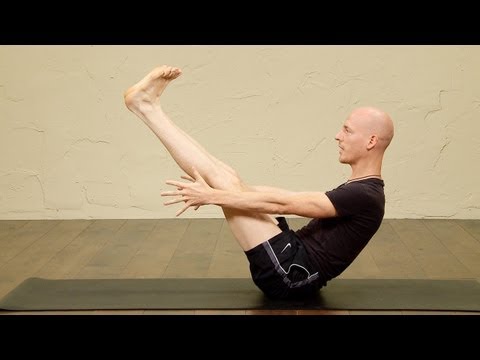
- Sit on your mat with your knees comfortably bent, your feet firmly on the ground, and arms beside your body.
- Inhale and extend your spine into a straight line. Exhale and slightly tuck in your chin.
- Stretch your arms out in front of you as you exhale, keeping your fingers spread wide. Stay here for a few breaths.
- When you’re ready, exhale and bring your body to a “v” position by leaning back slightly and extending your legs straight at a 45° angle to the floor. The joints of the big toes on each foot should touch.
- Keep head and neck in line with your shoulders. Eyes, fingers, and toes should be in line.
- You will feel your core muscles tighten. Continue breathing deeply and hold the boat position for 15 seconds.
- Release and exhale, returning your feet to the floor and lying on your back.
- Repeat 5 times with a 15-second break between reps.
2. Plank (Kumbhakasana)
This simple exercise engages several different muscle groups in the arms, legs, back, buttocks, and core.

- Begin by kneeling. Reach forward and place your hands on the floor shoulder-width apart, with fingers slightly apart and pointing forward.
- Raise your upper body with your arms so that they are perpendicular to the floor. Stretch your legs back until fully extended, the balls of your feet on the floor.
- With head in a straight line with your back, butt, and legs, inhale as you stretch your spine and pull in your abdominal muscles. Think of your body as one straight, long, strong plank of wood.
- Take deep measured breaths and maintain this position for 15-30 seconds. (Start slowly at the lower range and work your way up to a 30-second duration.)
- Exhale as you slowly drop your knees to the floor, rest for 15 seconds, then repeat steps 2-5. Do this 5 times.
If your back begins to feel the strain, concentrate on shifting the responsibility of holding your body’s weight to your core muscles. This pose should be avoided if you have lower back or shoulder injury or if you suffer from hypertension.